| An old friend pulled back into service - my old hemp bag is 9" x 8" and weighs next to nothing. It's cool because it can be carried as a purse or a daypack. |
| An old friend pulled back into service - my old hemp bag is 9" x 8" and weighs next to nothing. It's cool because it can be carried as a purse or a daypack. |
So, everyone wants to talk about what they carry on the trail - what they deem important inside their letterboxing pack. I recently posted about creating an 'emergency letterboxing kit' to keep in my car (or in my bag) for those impromptu boxing opportunities. Just having that little kit has made me yearn for a smaller letterboxing pack.
| This is a perfect size for a small backpack, and it is made wonderfully - unfortunately, it is not cheap. Definitely a downside. But, it won't wear out! |
I love my little Ori backpack, truly - it is the perfect size, it is made beautifully, waterproof with a trail-proof bottom, and it comes in a lot of really nice colors. I think you would be hard-pressed to wear this thing out. But, it is not cheap, which is definitely a downside. And it is not heavy, but what I carry in it is.
| The weight of the 8" x 5" Moleskin logbook, all those inks, and the plastic box all adds up! |
This might be more like it ...
| This Moleskin logbook is only 5.5" x 3.5", and that oversized Altoid tin (4" x 3") doesn't weigh anything close to that plastic box. And just two ink pads is a lot lighter than a whole rainbow. |
| on the trail in Troutdale, Oregon |
So, the problem - as inconsequential as it is - is regaining the ability to carve the lettering I want to carve. The solution is simple: Practice. Ha! No rocket science there! But, I find inspiration always helpful :)
Here's some lettering inspiration from a long time ago:
![]() |
| 2.25 x 3.5" An example of font carving; I am always fascinated with word clouds |
![]() |
| 2 x 3.25" |
I think there is a magical sweet spot when you discover the right tool(s) to use on the right material. In the past, PZ Kut (A or B) and the Staedtler carving gouges were complete and total magic for me. I look back at some of my old carves and marvel. Was I ever that accomplished at carving? I remember at the time thinking that I could carve anything I wanted with success. However, that is not the case today.
As you may know, I have spent quite a bit of time and resources to try new tools. I have also tried a number of carving blocks, but have always circled back to my old PZ scraps (which requires small stamps at this point!). I have one piece of PZ (A) that a dear friend gifted to me quite a while ago, and I am afraid to use it. It seems I am saving it for something very special.
But, I think I have found my way again. Not that I can carve anything I want - far from it! But, my theory has been proving true: The carving tools intended for lino and wood - such as the Flexcut, Dockyard, Ramelson, and Pfeil - probably work best on stiffer material. I had been using Firm Kut thinking that was going to be my go-to, but was really fighting with it more than anything. It has a nice, smooth cut, and I can get fine-ish detail, but I always struggle with those tight corners. It is more rubbery than I would like, I guess.
When I first tried Tan Z, I was using the Staedtler gouge, which proved to be quite a 'push' on that stiffer material; I have friends who can't use it due to hand fatigue. On a whim I took another try with the Tan Z, but this time instead of using the Staedtlers, I used the Pfeil tools primarily, and using Flexcut for cleanup. I was actually surprised with the results! I think I may have hit on that sought-after magic combination! I didn't experience the hand fatigue like before - perhaps this was due to the different way the tools are held. Further, the corners 'popped' nice and clean, and I was able to get that fine detail I want. At least for me and my style of carving, there was not a lot of 'clean up' required - which was rather surprising.
Here are some of my latest efforts. The images are not similar other than they were all carved on Tan Z with Pfeil and Flexcut tools. The real test is carving portraits and lettering, but I have been rather frustrated with lettering as of late, so I just stuck with a portrait for now.
![]() |
| Isn't that pie the cutest thing ever? It is just under an inch, the portrait is 1 x 1.5", and the ship is 3.5 x 2". |
![]() |
| found at Walmart |
| the plastic side goes on the wet trail, the green side protects my logbook, and is rigid enough to be a stamping surface |
First the pics:
![]() |
| Pfeil on the left, Dockyard on the right |
![]() |
| you can see the difference in steel finishing; the steel on the Pfeil is definitely thicker and polished |
![]() |
| the Dockyard is 1.5mm, so is wider at the spread, more so than the Pfeil, which is 1.0mm |
![]() |
| PZ Kut (B) |
In just straight line cuts, I can get a very fine line with the Dockyard, almost more than the Pfeil. Since the mm-measure is that of spread of the tool, it was the cutting edge that really mattered (the base of the 'v').
But, while I got a finer straight line with the Dockyard initially, the Pfeil maneuvers easier and smoother. Example - the inner circle cut was the Dockyard and the outer circle was with the Pfeil. I held the tool steady while turning the material for both circles.
The squiggles - definitely finer results with the Pfeil than the Dockyard. The finer squiggle (you can see the shaving laying on top of the material) was done with the Pfeil tool. The larger/thicker squiggle was done with the Dockyard.
The curves - the thick was with the Dockyard, the thinner '9' was with the Pfeil. Then I tried to duplicate the '9' with the Dockyard (the upper-most '9', and the other small curve in the right corner) - excellent. The small shape floating above the upper-most '9' was done with the Pfeil in one sweep, moving the material. Impressive.
While both are held overhand (with the index finger on resting and adjusting pressure on top of the steel part of the tool), the Pfeil is held at a bit more angle than the Dockyard. When comparing the straight fine lines, the Dockyard cut a very fine line; then I tried the Pfeil which kind of shmooshed along the surface. That is when I discovered the difference in angle. When adjusted, the Pfeil carved just as straight and thin as the Dockyard.
But, let's face it - how often are you required to carve a very fine straight line at random? For me, the challenge comes when getting in close to your image outlines that often curve in awkward ways, carving out the insides of letters, cutting a tight corner, and other fine details like eyes or lips. That is when smoothness and nimble-ness count. I would say the Pfeil is more 'nimble' in this regard.
The bottom line:
They are both fantastic tools. I found the Pfeil to be more smooth and less 'jumpy' than the Dockyard - this is probably due to the thickness of the steel and the polish. The Dockyard is wider at the tip, which could be more challenging than the thinner Pfeil (check out the first tool photo to see if you can see a difference). The angle that the carver must hold the Pfeil may require a bit of carver adjustment.
I would recommend both as strong contenders for top-notch tool. Ultimately, it is carver's preference and their carving style that may determine which is the better tool for them.
And remember: this is only my opinion. Your carving style may do better with one tool over another. The only way to know is to give them a try. :)
![]() |
| aren't they pretty? |
| trying to capture the difference between the 1.0mm and the .5mm - contrary to what appears in the photo, these tools are highly polished and smooth |
Another U.S.-made tool arrived in the mail today. This time its the Ramelson micro carving tool, 1.5mm.
![]() |
| Ramelson test on PZ (B), Distress Ink (Shabby Shutters green) |
![]() |
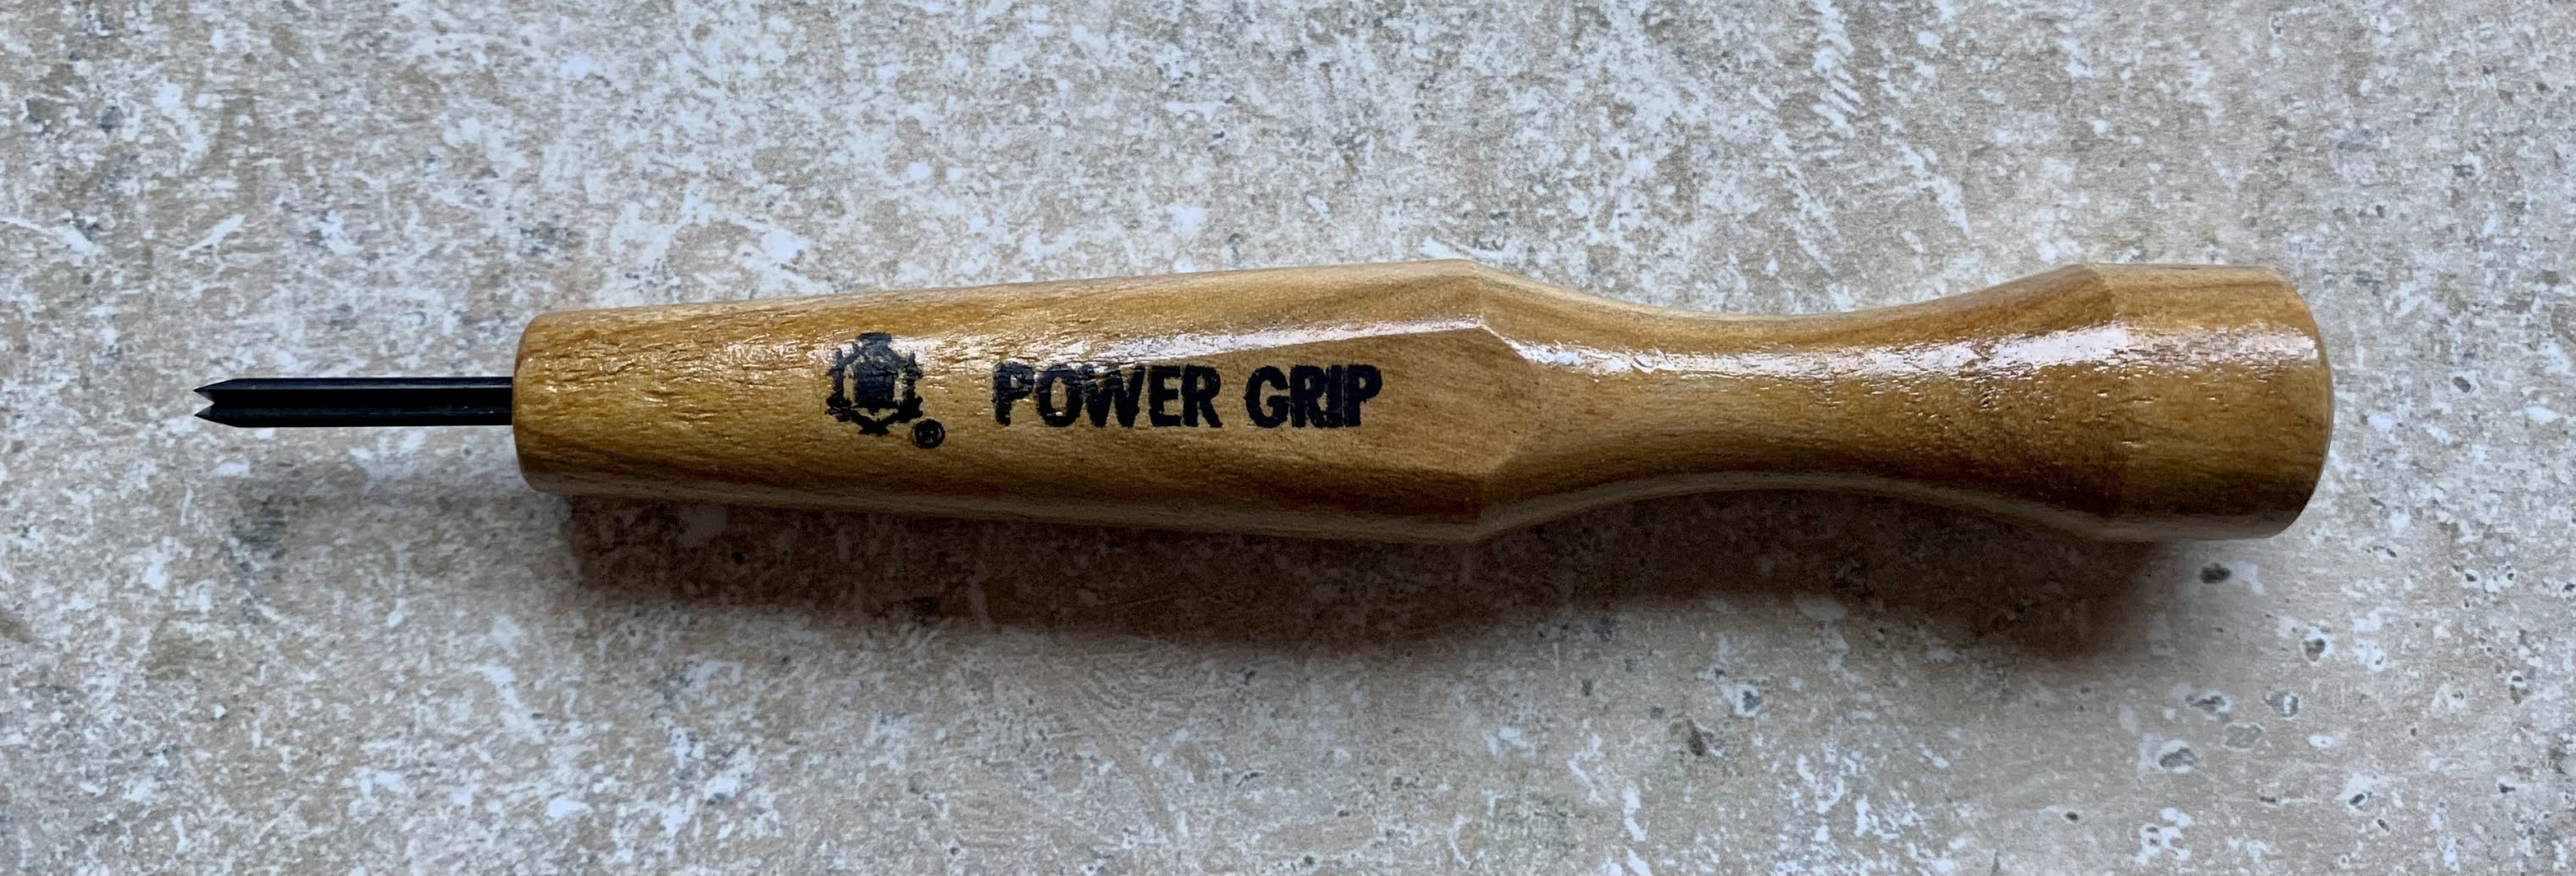
| this tool is about 5.5" in length, from maker Mikisyo |
I didn't hear anyone talking Power Grip, except on a lino-carving blog. Actually, the article Choosing the Best ... was pretty interesting, and I appreciated the reviews of several types of carving tools. And this tool is fairly inexpensive - I picked it up on Amazon for about $10.
The first thing I didn't care for was the handle - it looks nice, as you can see from the pic, but it is slick. If I held it like a pencil, my fingers slid toward the blade. If I held it overhand, the metal end is too short to place my index finger in a good position for control. Further, when I tried to rock it, say for coming up in a tight corner, the wood handle impeded movement. It definitely would have been better if the blade was bent a bit, and longer, for better maneuverability. Finally, I just couldn't get smooth cut results with this tool, and had to do a LOT of cleanup.
Here are a couple of shots of the tool. It is 1.5mm v-gouge, and it seems to be shaped similar to a Staedtler, where the bottom of the 'v' is farther back than the tips of the 'flanges' or sides. Also, the spread is good - not too wide, so it must be a 45 degree spread.
This tool may be great for lino or woodcarving, but I just couldn't control the cuts as much as I like.![]() |
| But here is where the rubber hits the road, so to speak - on the left is the Power Grip effort, and on the right is with Flexcut (ink: Marvy Matchables dye ink) |
This fine set of carving tools arrived in my mailbox, and you know I was eager to give them a try. I heard about these tools on the AQ boards - I had never heard of them. When I started carving, there were Speedball and Staedtler (and x-acto and needles, but that's a different story) - no one I knew talked about using woodcarving tools, but here we are! And let me tell you, these are pretty nice. I was impressed.
![]() |
| Dockyard Mini set, $60 on Mountain Woodcarvers |
They are not bent or curved as you might expect, but that is alright - never once did the wood get in my way of manipulating the tool through the material. I did hold them like the palm-carvers, in an overhand style with my index finger toward the carving tip for control (rather than holding the tool like a pencil). This is a new way of holding the tool for me, and it is beginning to become more comfortable.
I have tried to not use my Staedtler tools while trying all these others, just so I don't get confused. Carving with the Staedtler tools is just autopilot - they are so familiar. (However, I do still use the large Staedtler U-gouge for removing larger areas of material - it is the biggest I have.) Which leads me to a revelation - no matter what tool you choose to use, that is the one that will become your favorite. Did that even make sense? Haha! In other words, it really doesn't matter what tool you have, if you use it enough, you will become proficient with it, and it will become your comfortable favorite. So, the moral of the story may be: just pick one and use it - it will become your favorite!
Anyway, this set includes 2 v-tools and 2 u-gouges, 1.5mm and 2.0mm of each. I found myself really liking the 2.0mm u-gouge for cleanup, and the 1.5mm v-tool for detail work. But, I was wishing the v-tools had smaller spread of the 'v', which I think is 90 degrees (whereas a 45 degree v-tool would be thinner, but the cutting point would be the same). I think a 45 degree v-tool would allow more visibility of where you are cutting, while the 90 degree kind of gets in the way, a bit. I sometimes felt like I was carving blind.
Overall, I enjoyed using these tools, and they were certainly sharp. I gave them a test-drive with this image. I was thinking of stamping our siggy in the middle when we are out and about - we'll see.
![]() |
| nope ... still not perfect :) |
I tested this tool set out on a sample piece of carving block graciously sent to me by the Porras Posse. They sent me the white-green and the pink to try. I tended to like the pink better, but can't tell you why - both of them are pretty soft and carve easily. I would definitely buy some just to have on hand, and the price is right. 8 - 4x6 pieces for $14.99 from Amazon (link for pink, link for white-green).
![]() |
| look what came in the mail today! |
My theory is that these types of tools, which are intended to carve wood, might work better on firmer material. It seems that too much tip pressure applied to soft material, like pink stuff or the Japanese soft block, might just bury the tip in the mud. That's no good at all. So, I got out some Tan Z, and gave it a go.
To get a good feel, nothing is better for me than to see if I can carve my own scrawl. After transfer (I use the simple pencil transfer method), I worked and worked with that Tan Z. I like how it feels as I make cuts, but I feel like our relationship is complicated. Next, I tried these tools with the same image only on Firm Kut. Gosh, I like the Firm Kut material - it really responds well to my style of carving. Surprisingly, it took me half the time to carve the image with Firm Kut than Tan Z.
As for my theory ... the jury is still out. According to my hypothesis, the Tan Z should have worked better since it is the more firm material. But, that just wasn't the case.
So the tools themselves feel great in my hand. I feel like my hand is a bit small for them, but I will get used to it - I tend to choke up on the tip a bit because the tip feels so 'far away' when my palm is in the correct position. Further, I really like the smooth metal feel of the Staedtler tools - these tools are carbon steel, meaning a rougher feel and a bit more effort to remove tiny bits of material that get stuck. (I am kind of a freak about that, actually.) I think, with practice, that I could get some pretty precise detail using these. Definitely with practice.
![]() |
| Archival ink (coffee) |
Here's the final stamp images - as you can see, the Tan Z is not as happy as the Firm Kut. Certainly more bobbles on the Tan Z. And, of course, the Firm Kut more easily takes ink than the Tan Z. I found that there was a LOT less carving 'clean up' on the Firm Kut stamp than the Tan Z. (I really don't like 'noise' on my stamps, I like them to stamp clean.)
Bottom line: I like the Flexcut tools and will continue to work with them; I am definitely not sorry I purchased them. I like how sharp they are, how they feel in my hand, and that I was able to get some good detail. The only downside for me is getting used to the new hand position and the carbon steel as opposed to a smoother metal feel of the the Staedtlers. All in all, it was a pretty easy transition from the Staedtler gouge to these tools, despite the change in hand position.

How did the explorers of long ago find their way around? They used a compass and a map. Compasses are still used today to help people navigate across the landscape.
This first step in becoming an explorer is to learn how to read and use a compass. There are many types of compasses. This will get you started with a compass that has a rectangular base, a rotating dial, and housing made of clear plastic.
Now that you've taken a closer look at your compass, go outside and give this fun activity a try.
Pick up four stones or twigs to use as markers. Put them in your pocket. You might find it helpful to have someone read the following directions to you.
Did you return to your first marker?
Go back and walk to each marker.
What shape did you make? You should have made a square.
Now repeat the activity using the following degrees: 360, 90, 180, 270. This should also make the same square.
Congratulations, you now know how to use a compass.
(--Adapted from the Wisconsin Explorer program, Wisconsin Dept. of Natural Resources.)
![]() |
![]() |